
Installing Active Directory on a Windows Server 2022 involves setting up the server as a domain controller. Here’s a step-by-step guide to help you through the process:
Prerequisites
- Windows Server 2022 Installed: Ensure you have a clean installation of Windows Server 2022.
- Static IP Address: Configure a static IP address on the server.
- Admin Account: You need administrative privileges to install and configure Active Directory.
Steps to Install Active Directory
- Open Server Manager:
- Click on the
Startmenu. - Select
Server Manager.
- Click on the
- Add Roles and Features:
- In Server Manager, click on
Managein the top-right corner. - Select
Add Roles and Features.
- In Server Manager, click on
- Role-based or Feature-based Installation:
- In the Add Roles and Features Wizard, select
Role-based or feature-based installation. - Click
Next.
- In the Add Roles and Features Wizard, select
- Select Destination Server:
- Choose the server you want to configure from the server pool.
- Click
Next.
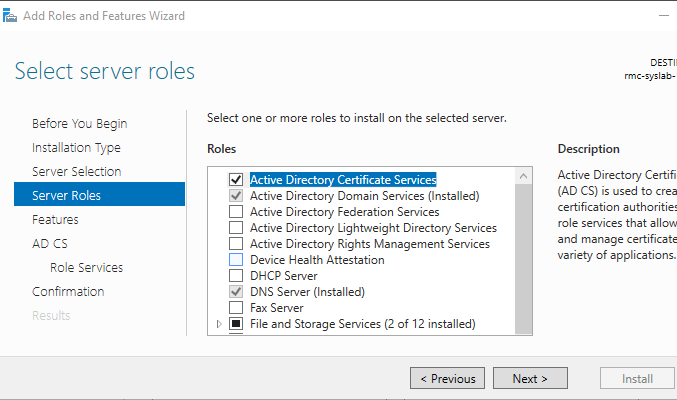
- Select Server Roles:
- In the
Select server roleswindow, check the box forActive Directory Domain Services. - A dialog box will pop up to add required features. Click
Add Features. - Click
Next.
- In the
- Select Features:
- You can select additional features if needed, but the defaults are usually sufficient.
- Click
Next.
- AD DS Information:
- Review the information about Active Directory Domain Services.
- Click
Next.
- Confirmation:
- Review your selections.
- Check the box to
Restart the destination server automatically if required. - Click
Install.
- Installation Progress:
- The installation process will begin. This may take a few minutes.
- Once the installation is complete, click on
Close.
- Promote this Server to a Domain Controller:
- In Server Manager, click on the flag icon with a yellow triangle in the top-right corner.
- Click on
Promote this server to a domain controller.
Configure Active Directory Domain Services
- Deployment Configuration:
- In the Active Directory Domain Services Configuration Wizard, select
Add a new forest. - Enter your
Root domain name(e.g.,example.com). - Click
Next.
- In the Active Directory Domain Services Configuration Wizard, select
- Domain Controller Options:
- Choose the
Forest functional levelandDomain functional level. For a new installation, you can selectWindows Server 2022. - Check the boxes for
DNS serverandGlobal Catalog (GC). - Enter a
Directory Services Restore Mode (DSRM) password. - Click
Next.
- Choose the
- DNS Options:
- Ignore the DNS delegation warning if it appears and click
Next.
- Ignore the DNS delegation warning if it appears and click
- Additional Options:
- Verify the
NetBIOS domain nameand clickNext.
- Verify the
- Paths:
- Specify the locations for the
Database folder,Log files folder, andSYSVOL folder. - The default locations are usually fine.
- Click
Next.
- Specify the locations for the
- Review Options:
- Review your configuration and click
Next.
- Review your configuration and click
- Prerequisites Check:
- The wizard will perform a prerequisites check. Ensure all checks are passed.
- Click
Install.
Completing the Installation
- The server will automatically restart after the installation is complete.
- Once restarted, the server will be a domain controller with Active Directory Domain Services installed and configured.
Post-Installation Steps
- Verify Installation:
- Log in with your domain credentials.
- Open
Server Managerand check theAD DSstatus.
- Create Organizational Units (OUs):
- Open
Active Directory Users and Computers. - Create OUs to organize users, groups, and computers.
- Open
- Create User Accounts and Groups:
- Use
Active Directory Users and Computersto create user accounts and groups as needed.
- Use
- Configure Group Policies:
- Open
Group Policy Managementto create and manage Group Policy Objects (GPOs).
- Open
- Configure DNS:
- Ensure that the DNS settings are correct and that the server can resolve domain names.
Example of Creating an OU and User
- Create an Organizational Unit (OU):
- Open
Active Directory Users and Computers. - Right-click the domain (e.g.,
example.com) and selectNew>Organizational Unit. - Name the OU (e.g.,
IT Department) and clickOK.
- Open
- Create a User:
- Right-click the OU (e.g.,
IT Department) and selectNew>User. - Enter the user details (e.g., First name, Last name, User logon name) and click
Next. - Set a password for the user and configure the password options (e.g., require password change at next logon).
- Click
Nextand thenFinish.
- Right-click the OU (e.g.,
By following these steps, you should be able to successfully install and configure Active Directory on Windows Server 2022.


