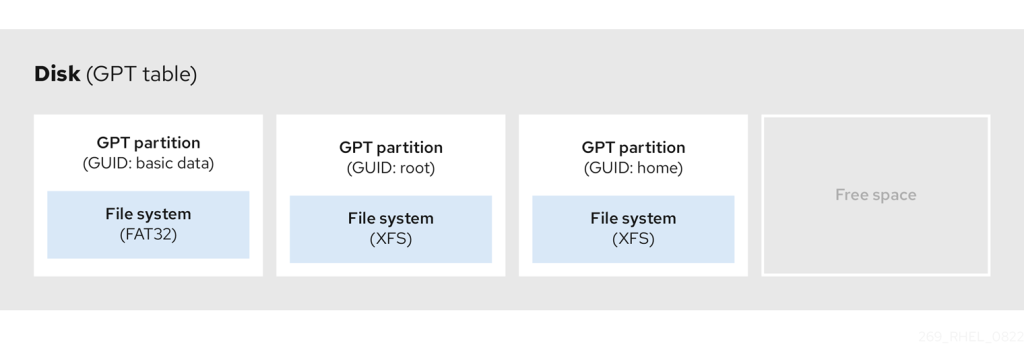
Managing system disks on Red Hat Enterprise Linux (RHEL) involves tasks like viewing disk information, partitioning disks, formatting partitions, mounting/unmounting file systems, and setting up LVM (Logical Volume Management). Here’s a detailed guide on how to perform these tasks.
Viewing Disk Information
List all disks and partitions:
lsblk
Display detailed disk usage:
df -h
Show disk information:
fdisk –l
Display partition information:
parted –l
Partitioning Disks
Open the disk in fdisk (replace /dev/sdX with your disk):
sudo fdisk /dev/sdX
Common fdisk commands:
n: Create a new partition.
d: Delete a partition.
p: Print the partition table.
w: Write changes to disk and exit.
q: Quit without saving changes.
Example to create a new partition:
Open fdisk:
sudo fdisk /dev/sdX
Enter n to create a new partition.
Choose the partition type (p for primary, e for extended).
Select the partition number.
Set the starting and ending sectors.
Enter w to write changes and exit.
Formatting Partitions
Format the partition with ext4 filesystem:
sudo mkfs.ext4 /dev/sdX1
Format the partition with XFS filesystem:
sudo mkfs.xfs /dev/sdX1
Format the partition with FAT32 filesystem:
sudo mkfs.vfat /dev/sdX1
Mounting and Unmounting File Systems
Create a mount point:
sudo mkdir /mnt/mydisk
Mount the partition:
sudo mount /dev/sdX1 /mnt/mydisk
Unmount the partition:
sudo umount /mnt/mydisk
Automatically mount partitions at boot:
Edit the /etc/fstab file:
sudo nano /etc/fstab
Add an entry for the partition:
/dev/sdX1 /mnt/mydisk ext4 defaults 0 0
Logical Volume Management (LVM)
Install LVM tools:
sudo yum install lvm2
Create Physical Volumes (PVs):
sudo pvcreate /dev/sdX1 /dev/sdY1
Create a Volume Group (VG):
sudo vgcreate myvg /dev/sdX1 /dev/sdY1
Create Logical Volumes (LVs):
sudo lvcreate -n mylv -L 20G myvg
Format the Logical Volume:
sudo mkfs.ext4 /dev/myvg/mylv
Mount the Logical Volume:
sudo mkdir /mnt/mylv
sudo mount /dev/myvg/mylv /mnt/mylv
Resizing Logical Volumes
Resize the filesystem and Logical Volume (ext4):
Unmount the filesystem:
sudo umount /mnt/mylv
Resize the Logical Volume:
sudo lvresize -L +10G /dev/myvg/mylv
Resize the filesystem:
sudo resize2fs /dev/myvg/mylv
Remount the filesystem:
sudo mount /dev/myvg/mylv /mnt/mylv
Resize the filesystem and Logical Volume (XFS):
Resize the Logical Volume:
sudo lvresize -L +10G /dev/myvg/mylv
Resize the filesystem (XFS does not require unmounting):
sudo xfs_growfs /mnt/mylv
Monitoring and Managing Disk Usage
Check disk usage by directory:
du -sh /path/to/directory
Find the largest files/directories:
du -ah / | sort -n -r | head -n 10
Check inode usage:
df –i
Example Workflow for Adding a New Disk
Add a new disk to the system and identify it (/dev/sdX):
lsblk
Partition the new disk:
sudo fdisk /dev/sdX
Create a new primary partition:
Enter n for a new partition.
Choose p for primary.
Use defaults for partition number, first sector, and last sector.
Enter w to write the changes.
Format the new partition:
sudo mkfs.ext4 /dev/sdX1
Create a mount point:
sudo mkdir /mnt/newdisk
Mount the new partition:
sudo mount /dev/sdX1 /mnt/newdisk
Add the new partition to /etc/fstab for automatic mounting:
sudo nano /etc/fsab
Add the line:
/dev/sdX1 /mnt/newdisk ext4 defaults 0 0
By following these steps, you can effectively manage disks on a RHEL system.