
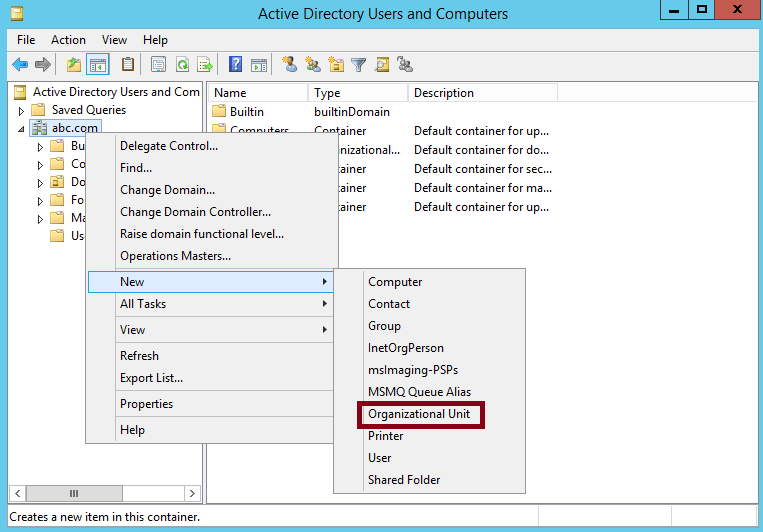
Creating Organizational Units (OUs) in Active Directory helps you manage and organize users, groups, computers, and other resources efficiently. Here’s a step-by-step guide to creating OUs in Active Directory on Windows Server 2022:
Prerequisites
- Active Directory Installed: Ensure that Active Directory Domain Services (AD DS) is installed and configured.
- Administrative Privileges: You need administrative privileges to create OUs.
Steps to Create Organizational Units
- Open Active Directory Users and Computers:
- Click on the
Startmenu. - Search for
Active Directory Users and Computersand open it.
- Click on the
- Navigate to the Domain:
- In the left-hand pane, expand the domain where you want to create the OU (e.g.,
example.com).
- In the left-hand pane, expand the domain where you want to create the OU (e.g.,
- Create an Organizational Unit:
- Right-click on the domain or an existing OU where you want to create the new OU.
- Select
New>Organizational Unit.
- Name the Organizational Unit:
- In the
New Object - Organizational Unitwindow, enter a name for the OU (e.g.,IT Department). - Optionally, check the box
Protect container from accidental deletionto prevent accidental deletion of the OU. - Click
OK.
- In the
- Verify the OU Creation:
- The new OU should now appear in the left-hand pane under the domain or parent OU.
Example of Creating Nested OUs
If you want to create a more structured hierarchy, you can create nested OUs. Here’s how:
- Create a Top-Level OU:
- Follow the steps above to create a top-level OU (e.g.,
Departments).
- Follow the steps above to create a top-level OU (e.g.,
- Create Nested OUs:
- Right-click on the top-level OU (
Departments) and selectNew>Organizational Unit. - Name the nested OU (e.g.,
IT Department) and clickOK. - Repeat for other departments or sub-divisions (e.g.,
HR Department,Finance Department).
- Right-click on the top-level OU (
Example Structure
- example.com
- Departments
- IT Department
- HR Department
- Finance Department
- Payroll
- Departments
Managing Organizational Units
After creating OUs, you can manage them by adding users, groups, and computers. Here’s how:
- Adding Users to an OU:
- Right-click the OU (e.g.,
IT Department). - Select
New>User. - Follow the wizard to create a new user account within the OU.
- Right-click the OU (e.g.,
- Adding Groups to an OU:
- Right-click the OU.
- Select
New>Group. - Follow the wizard to create a new group within the OU.
- Adding Computers to an OU:
- Right-click the OU.
- Select
New>Computer. - Follow the wizard to add a new computer object within the OU.
Applying Group Policies to OUs
You can apply Group Policies to OUs to manage settings for users and computers within the OU:
- Open Group Policy Management:
- Click on the
Startmenu. - Search for
Group Policy Managementand open it.
- Click on the
- Create a Group Policy Object (GPO):
- Right-click the OU where you want to apply the policy.
- Select
Create a GPO in this domain, and Link it here.... - Name the GPO (e.g.,
IT Department Policy) and clickOK.
- Edit the GPO:
- Right-click the newly created GPO and select
Edit. - Configure the settings as needed (e.g., security settings, software deployment).
- Right-click the newly created GPO and select
Example: Creating an OU and Adding a User
- Create an Organizational Unit (OU):
- Follow the steps above to create an OU named
Marketing.
- Follow the steps above to create an OU named
- Add a User to the OU:
- Right-click the
MarketingOU and selectNew>User. - Enter the user details (e.g., First name: John, Last name: Doe, User logon name: jdoe).
- Set a password for the user and configure the password options (e.g., require password change at next logon).
- Click
Nextand thenFinish.
- Right-click the
By following these steps, you can create and manage Organizational Units in Active Directory to effectively organize and control your network resources.


