
Installing Red Hat Enterprise Linux (RHEL) 9 in VirtualBox involves several steps: creating a virtual machine, configuring the VM settings, and performing the RHEL installation. This detailed guide will walk you through the process.
1. Prerequisites
- VirtualBox: Ensure you have the latest version of Oracle VM VirtualBox installed. You can download it from VirtualBox’s official website.
- RHEL 9 ISO: Download the RHEL 9 installation ISO from the Red Hat Customer Portal.
2. Create a New Virtual Machine
2.1 Open VirtualBox and Create a New VM
- Open VirtualBox and click on
Newto create a new virtual machine. - Name and Operating System:
- Name: Give your VM a name, e.g., “RHEL9”.
- Type: Linux.
- Version: Red Hat (64-bit).
- Click
Next.
2.2 Memory Size
- Allocate memory (RAM) to your VM. A minimum of 2 GB is recommended, but 4 GB or more is preferred for better performance.
- Click
Next.
2.3 Hard Disk
- Create a Virtual Hard Disk:
- Select
Create a virtual hard disk now. - Click
Create.
- Select
- Hard Disk File Type:
- Select
VDI (VirtualBox Disk Image). - Click
Next.
- Select
- Storage on Physical Hard Disk:
- Choose
Dynamically allocated. - Click
Next.
- Choose
- File Location and Size:
- Set the disk size to at least 20 GB.
- Click
Create.
3. Configure VM Settings
3.1 Adjust General Settings
- Select the VM (RHEL9) in VirtualBox and click
Settings. - System:
- Under the
Motherboardtab, ensure theFloppydevice is unchecked. - Under the
Processortab, allocate 2 or more CPUs if available. - Enable
Enable PAE/NX.
- Under the
- Display:
- Under the
Screentab, allocate at least 128 MB of Video Memory. - Enable
3D Accelerationif desired.
- Under the
- Storage:
- Select the
EmptyCD/DVD drive under theController: IDE. - Click the
diskicon and chooseChoose a disk file. - Locate and select the RHEL 9 ISO file.
- Select the
- Network:
- Under the
Adapter 1tab, selectAttached to: NATorBridged Adapterfor internet access.
- Under the
- Click
OKto save the settings.
4. Install Red Hat Enterprise Linux 9
4.1 Start the VM
- Select the VM (RHEL9) in VirtualBox and click
Start. - The VM will boot from the RHEL 9 ISO. Select
Install Red Hat Enterprise Linux 9from the boot menu and pressEnter.
4.2 Begin Installation
- Language Selection:
- Choose your language and click
Continue.
- Choose your language and click
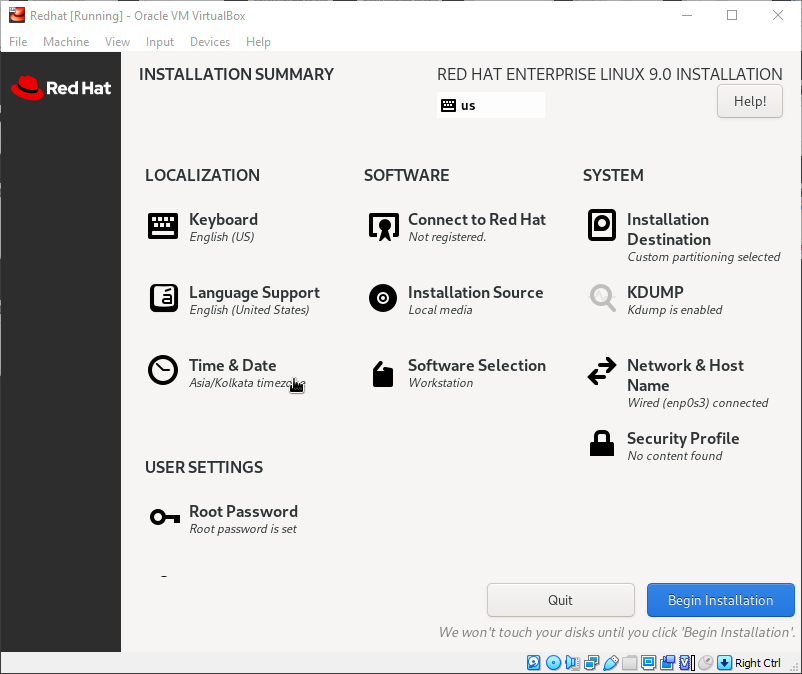
- Installation Summary:
- Localization:
Keyboard: Choose the desired keyboard layout.Language Support: Confirm the selected language.Time & Date: Set your time zone.
- Software:
Installation Source: Should be set to the local media (the ISO).Software Selection: Choose the base environment, e.g.,Server with GUI, and any additional components you need.
- System:
Installation Destination: Select the virtual hard disk and chooseAutomatic partitioning.Kdump: Leave it enabled unless you have a specific reason to disable it.Network & Hostname: Configure the network connection and set the hostname.
- Localization:
- Click
Begin Installation.
4.3 Configure User Settings
- While the installation is in progress, set the
Root Passwordand create a user account with administrative privileges.
5. Complete Installation
- Once the installation is complete, click
Reboot. - Remove the ISO from the virtual CD/DVD drive in VirtualBox.
- The VM will reboot into your new RHEL 9 installation.
6. Post-Installation Steps
6.1 Update the System
- Open a terminal and update the system:bash
sudo dnf update -y
6.2 Install VirtualBox Guest Additions
- Insert Guest Additions CD Image:
- In the VirtualBox VM window, go to
Devices>Insert Guest Additions CD Image.
- In the VirtualBox VM window, go to
- Mount the CD Image:
sudo mount /dev/cdrom /mnt
3. Run the Installer:
sudo /mnt/VBoxLinuxAdditions.run
4. Reboot the VM:
sudo reboot
By following these steps, you should have a fully functional RHEL 9 installation in VirtualBox. This setup provides a flexible environment for testing, development, or learning purposes.


